Navigating the Magento 2 admin is a pretty intuitive experience once you’re familiar with the basic, high-level structure and functions. Getting to that level of comfort though, can be a challenge. Whether you were an M1 pro that migrated to M2, or a total Magento novice, approaching the task of simple admin management can feel a bit daunting.
But it’s a skill worth acquiring if you own, or manage, an M2 webstore. For most of us, this means having the know-how to edit and maintain. And the ability to accurately edit existing content without blowing it up, more often than not, comes from being able to successfully create it. So while you likely will never be responsible for manually creating hundreds of products within the Magento admin, I can guarantee that you, at some point, will need to know how to create a configurable product.
What Is A Configurable Product?
In Magento there are at least three types of products: simple, configurable, and bundled. A configurable product appears as a single product with lists of options for each variation. However, each option represents a separate, simple product with a distinct SKU, which makes it possible to track inventory for each variation. Let me give you an example:
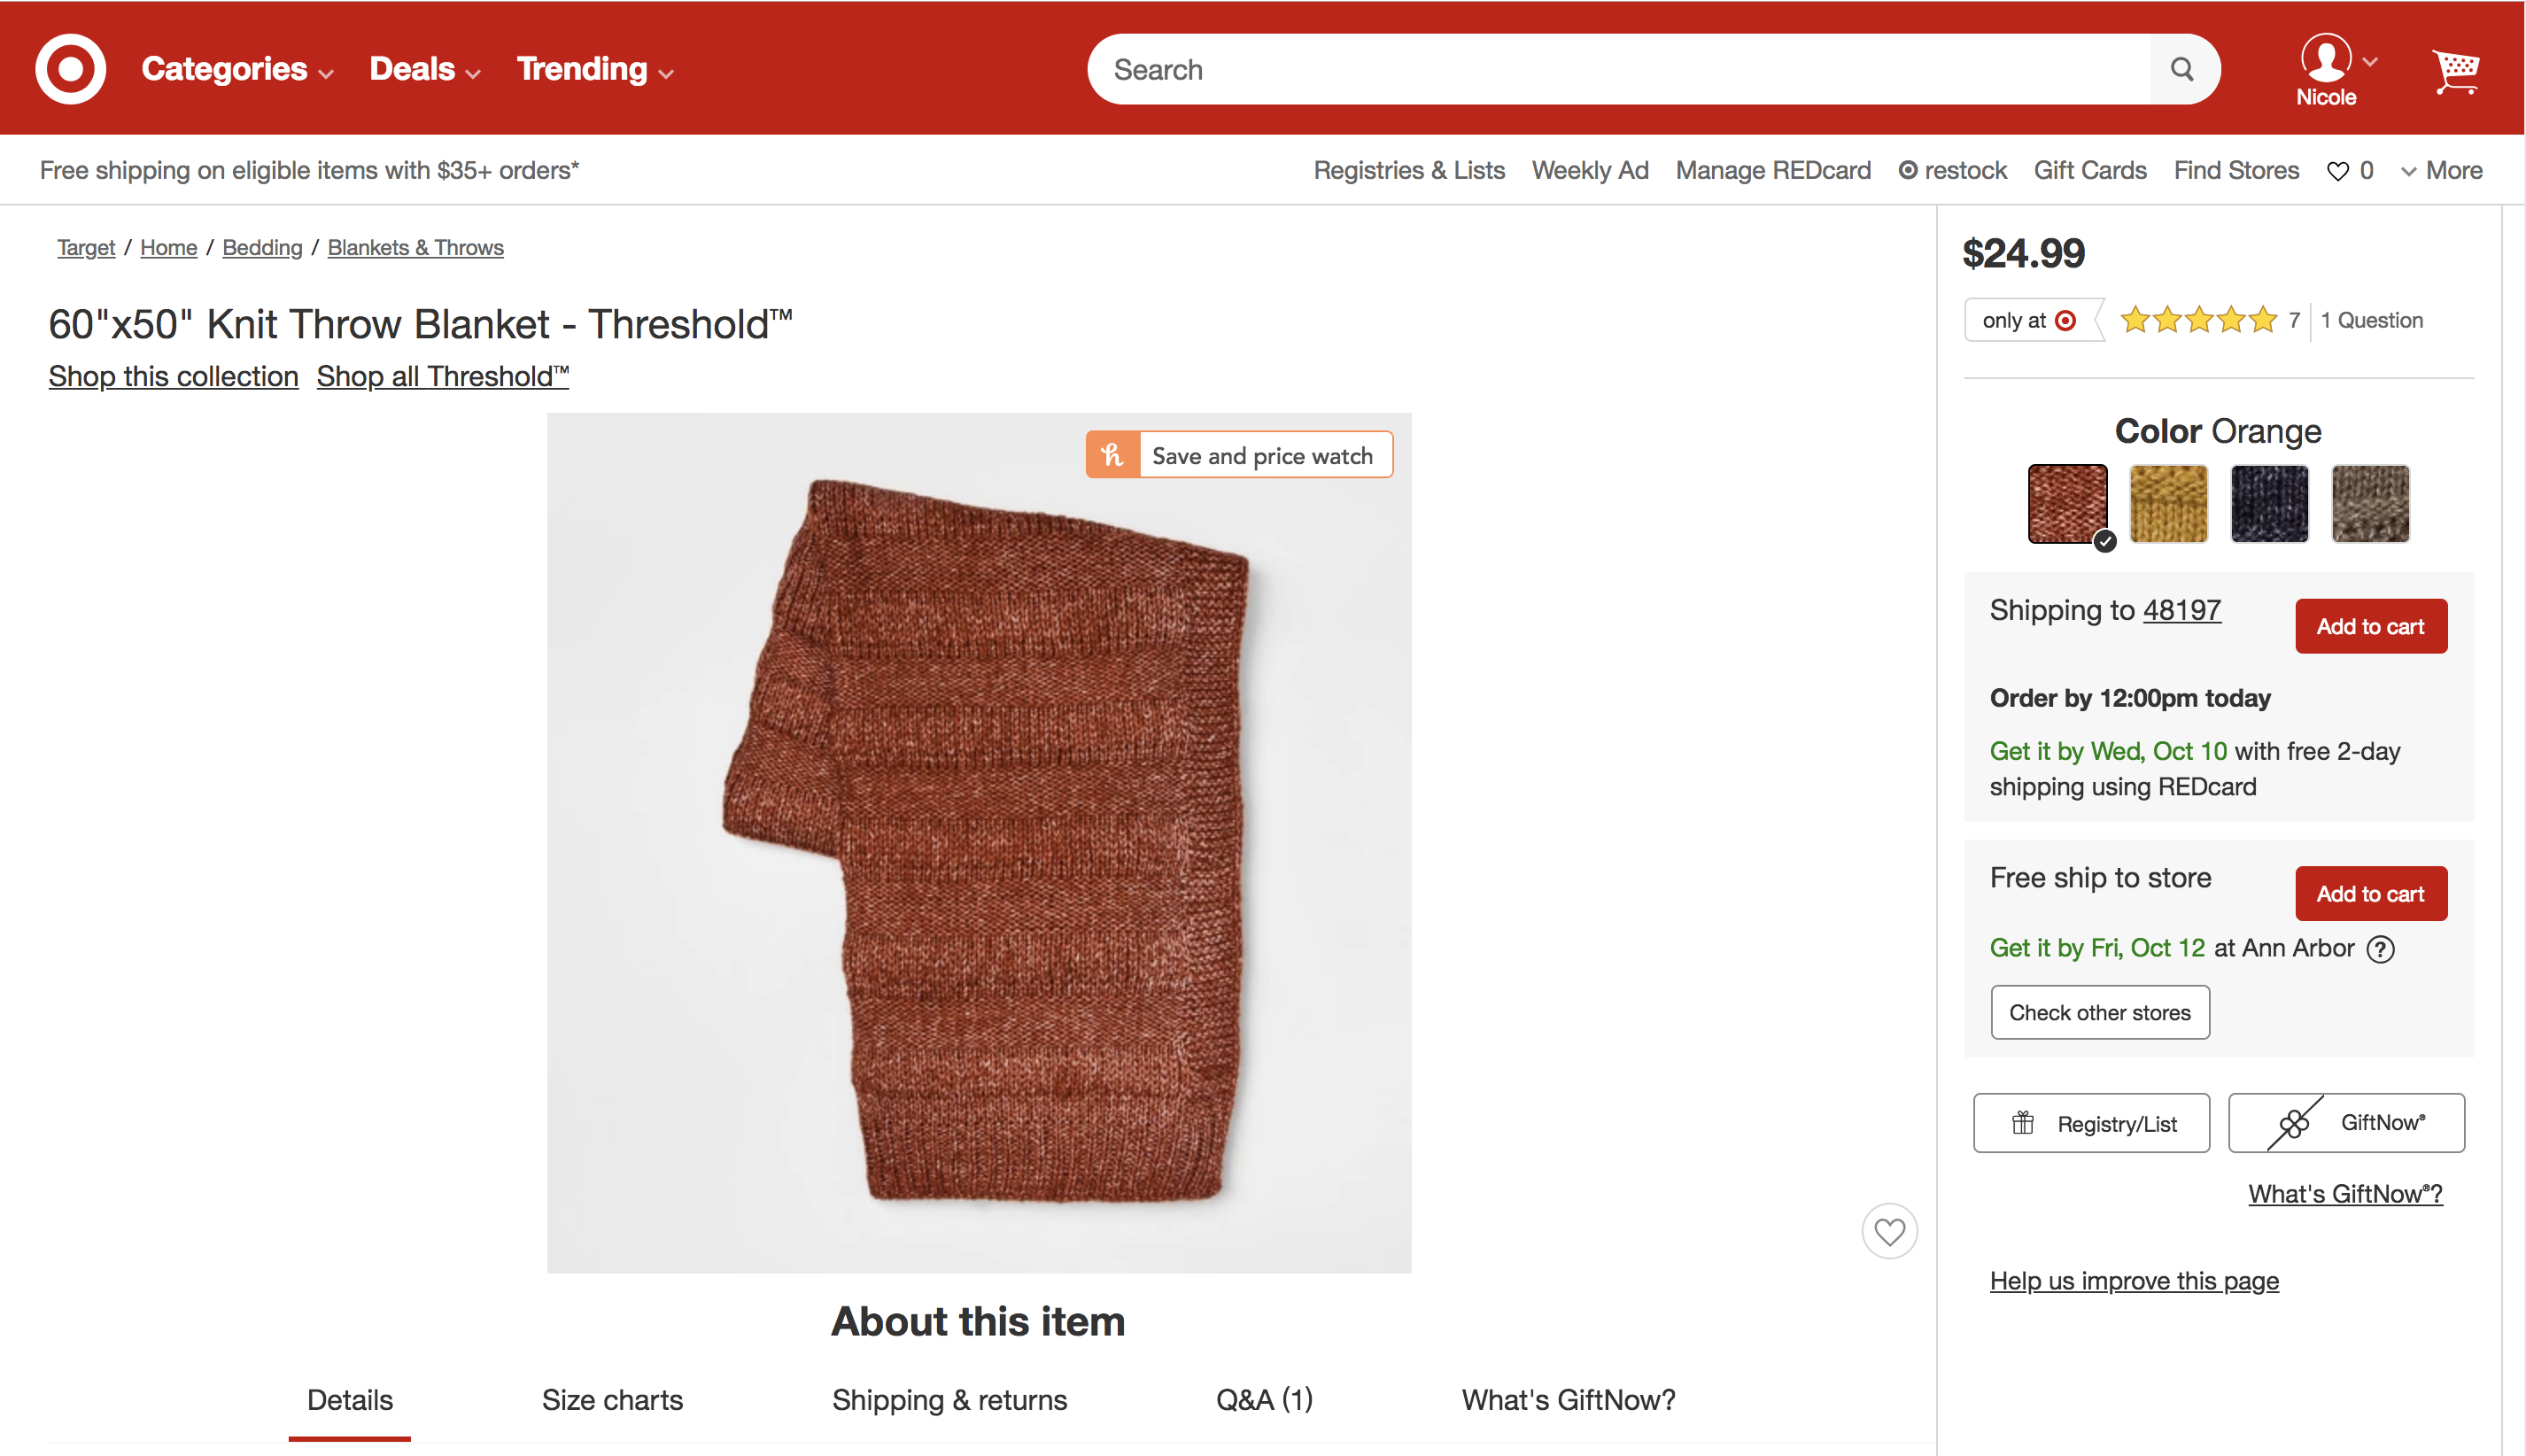 One of my favorite stores, like most 30-year-old women, is Target. I know it makes me a Millennial Mom stereotype and I do not care. It’s a magical place. Fight me.
Let’s say that in achieving the spirit of fall I decide that my house needs a few extra throws. A fuzzy blanket, homemade apple crisp and a cup of very, very strong coffee are the basics of the season at my house. And because I spend my day writing blogs like this one, I am going to have to buy that blanket online. We’ll skip the narrative of how I got here, but the short of it is that I’ve decided that the 60″x50″ Threshold Knit Blanket is the perfect accent to my pumpkin spice creamer.
You’ll see on the right side of the product page that this particular blanket comes in a variety of colors: orange, gold, blue, and brown. Each of these options is a simple product with a unique SKU associated. But it appears to the user on the front end of the website as one product available in four colors. And THAT is a configurable product!
Let’s Get Started
Before you begin setup of a configurable product, you will want to have created the simple products associated with it. For information on how to create a simple product, check out this handy guide by Director of Project Management, Andrea Evans. Once you have that step complete, you’re onto building out that configurable product. Woo! Let’s get started:
General Product Setup
This section of our tutorial applies to all types of products – it is not specific to configurable. If you are familiar with the general requirements of product creation and want to skip right to the nitty gritty of configurable products, scroll on down to Configuration Section Setup – Step 1.
Catalog: Log in to the admin. A navigation bar will appear on the left side of the dashboard page. From this navigation, select “catalog.”
Products: From the Catalog category selection, a secondary navigation will appear. Select the subcategory “products.”
Add Product: From the Products page, select the orange “add product” dropdown menu in the upper right hand corner. Select “configurable product.”
Enable Product: Verify that the product is enabled to be viewed on the front end of the website. “Enable Product” option is at the top of the product configuration options.
Attribute Sets: Select appropriate attribute set. This is the set of specifications of the product. The default is the recommended selection.
Product Name: Input Name in appropriate field. The first letter of all words in product title should be capitalized. Ex.: “Human Element Test Product.” This field is required.
SKU: Input correct SKU for simple product(s). This field is required.
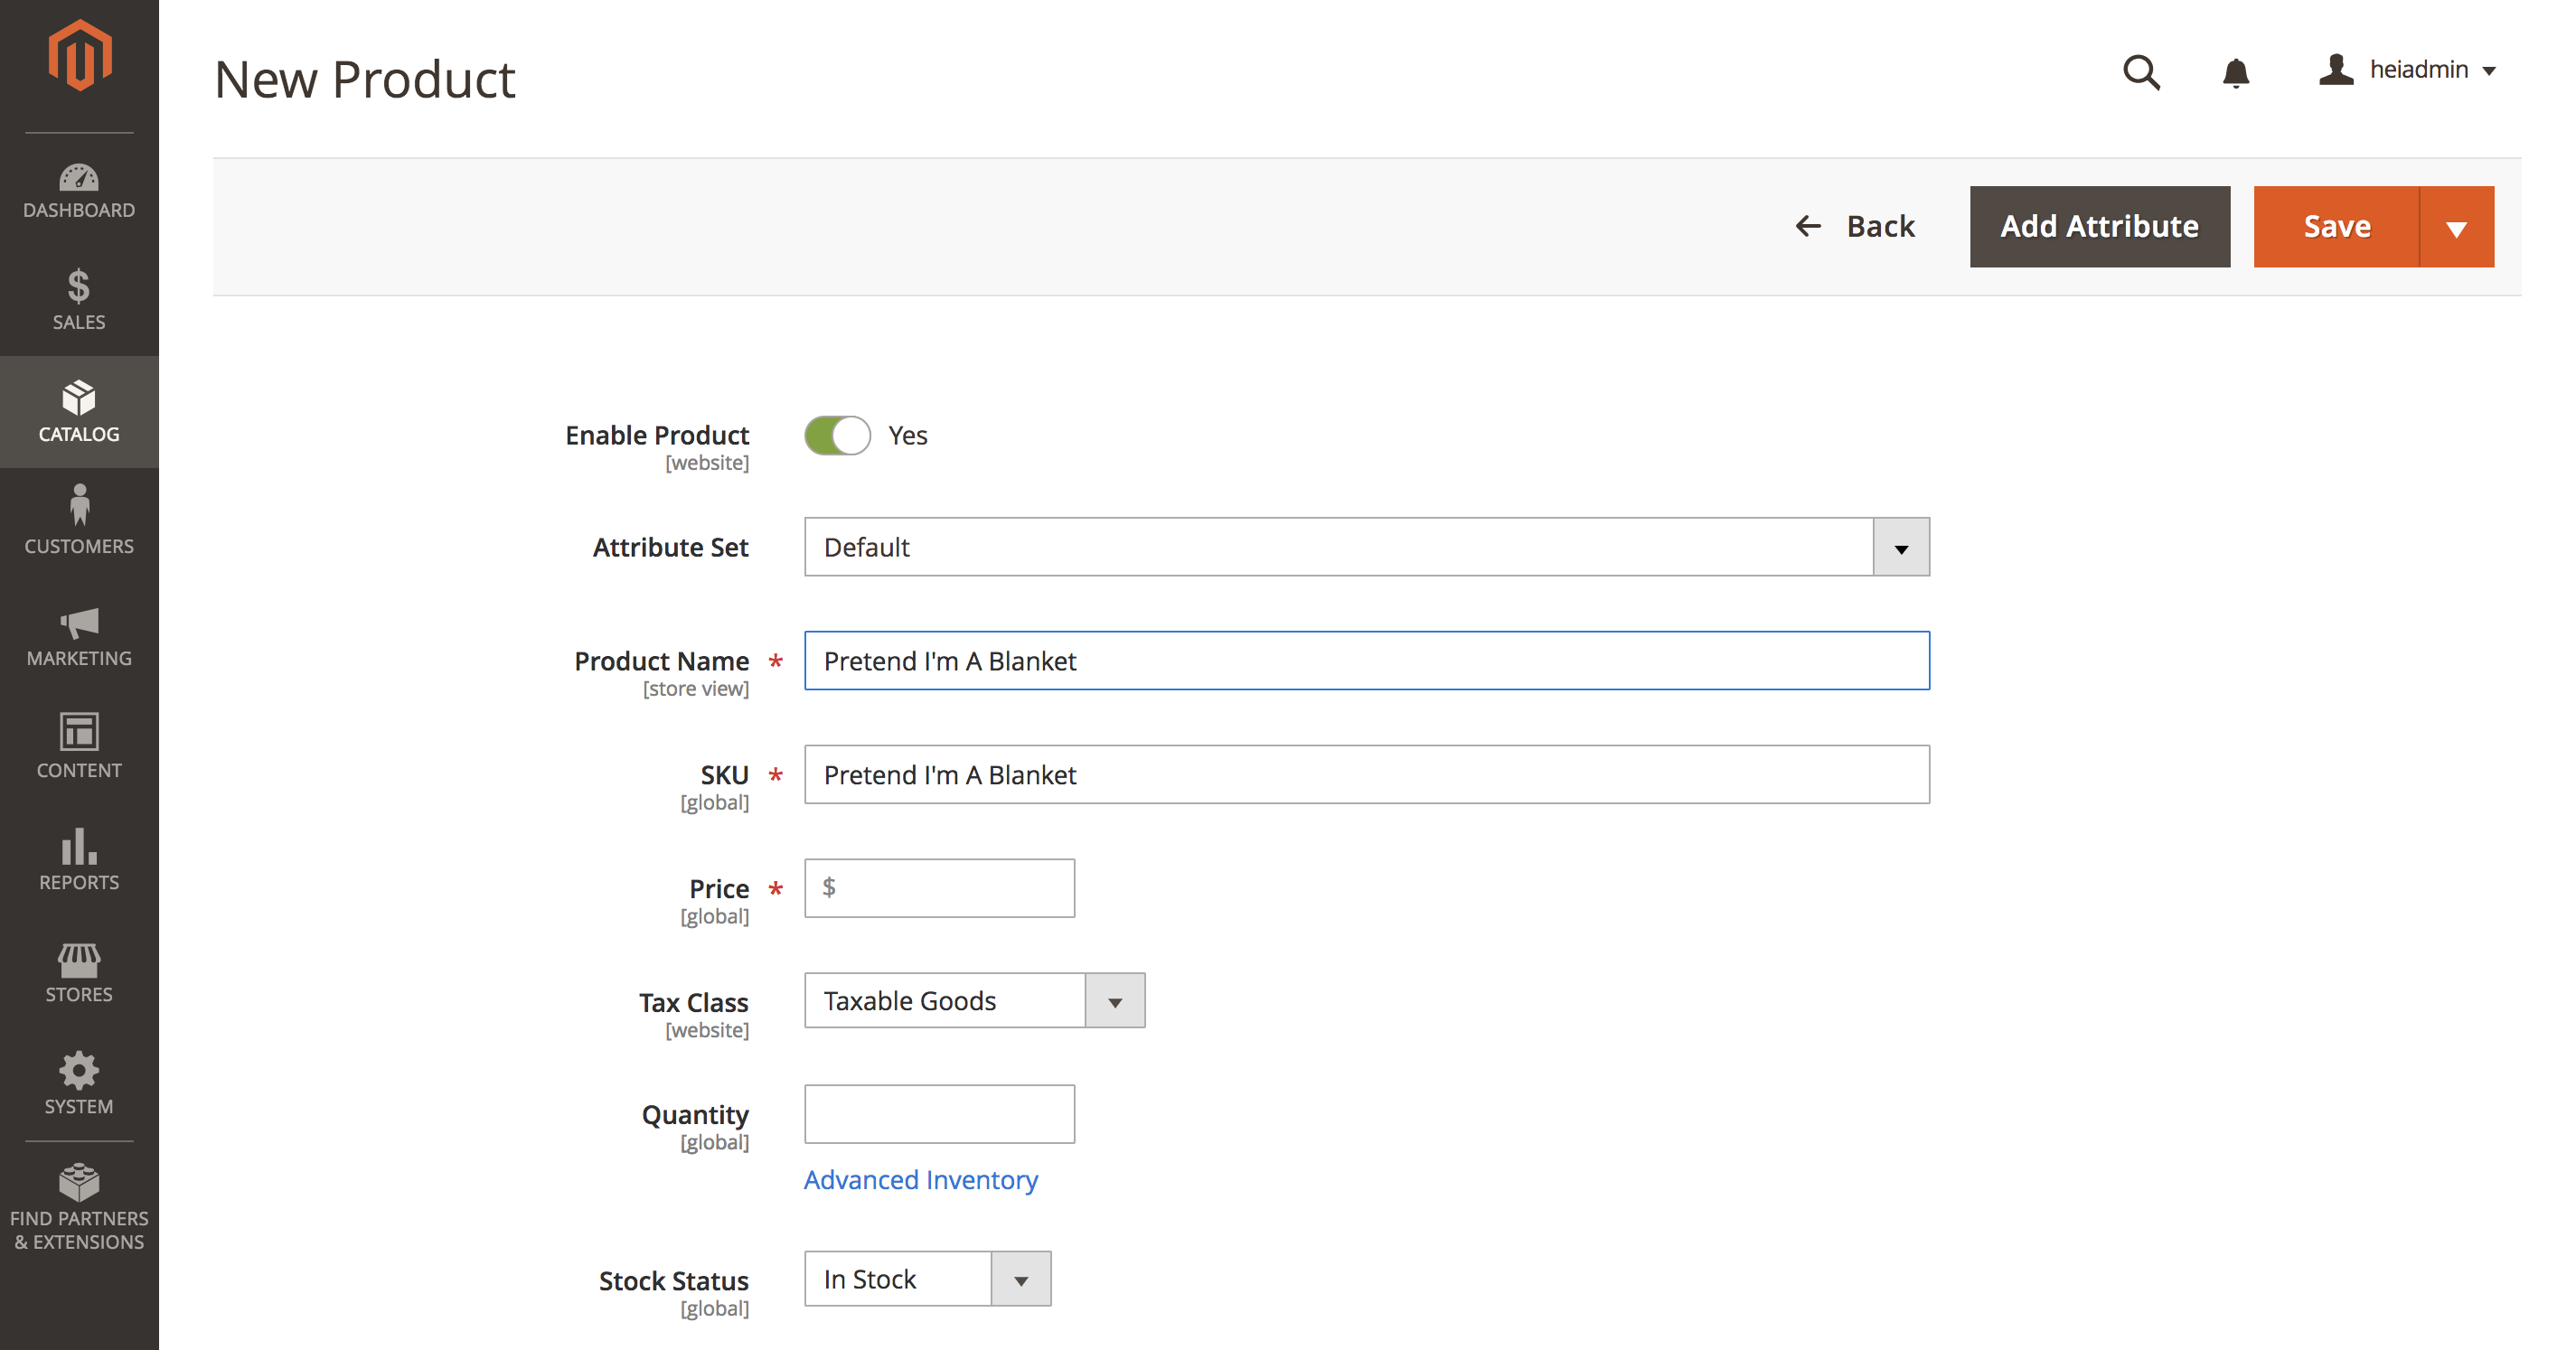 Price: Input correct price for product.
Tax Class: Specify if item is or is not a taxable good.
Quantity: Input quantity of item.
Stock Status: Specify if item is in or out of stock. Item will still appear on front end of website even if “out of stock” is specified. To make product visible only from the admin, it must be disabled. See step 4.
Weight: Input weight of item. In second window, specify that “this item has weight.” If “this items has no weight” is selected, the platform will assume that it is digital/downloadable rather than a tangible item.
Categories: Select appropriate product category from dropdown menu.
Visibility: Specify that the product is visible from the “catalog” and “search” options. Simple products should be visible individually.
Set As New Product: Specify dates that product should be set as new on the front end of the website. If the product should not be specified as new, leave calendar dates blank.
Country of Manufacture: Specify country of manufacture.
Order Threshold Quantity: Input the product quantity that customers are able to order to. This option is used to alert the user that there are limited products available for purchase.
Out of Stock Date: Specify the beginning date that the product should appear as out of stock on the front end of the website. Item will still appear on front end of the website even if “out of stock” is specified. To make product visible only from the admin, it must be disabled. See step 4.
Content Section Setup
Short Description: This section of copy appears to the right of the product image. The short description should include the important details that are most relevant to a user’s need for the product. The short description appears above the long description for SEO purposes
Description: This section of copy appears at the bottom of the product page in the “details” section. This is the long description of the product and should include additional copy to accompany the short product description.
Configuration Section Setup – Step 1
Select the “create configurations” button on the right side of the section menu. This will open a new window. The window will not open until the product name, SKU, and price are specified. The image provided as an example (below) is from an existing demo product for Human Element internal training – a new configurable product will not have the listed configurations as seen in the provided image.
Select Attributes: A list of defined attributes is available to select from, or you can create a new attribute.
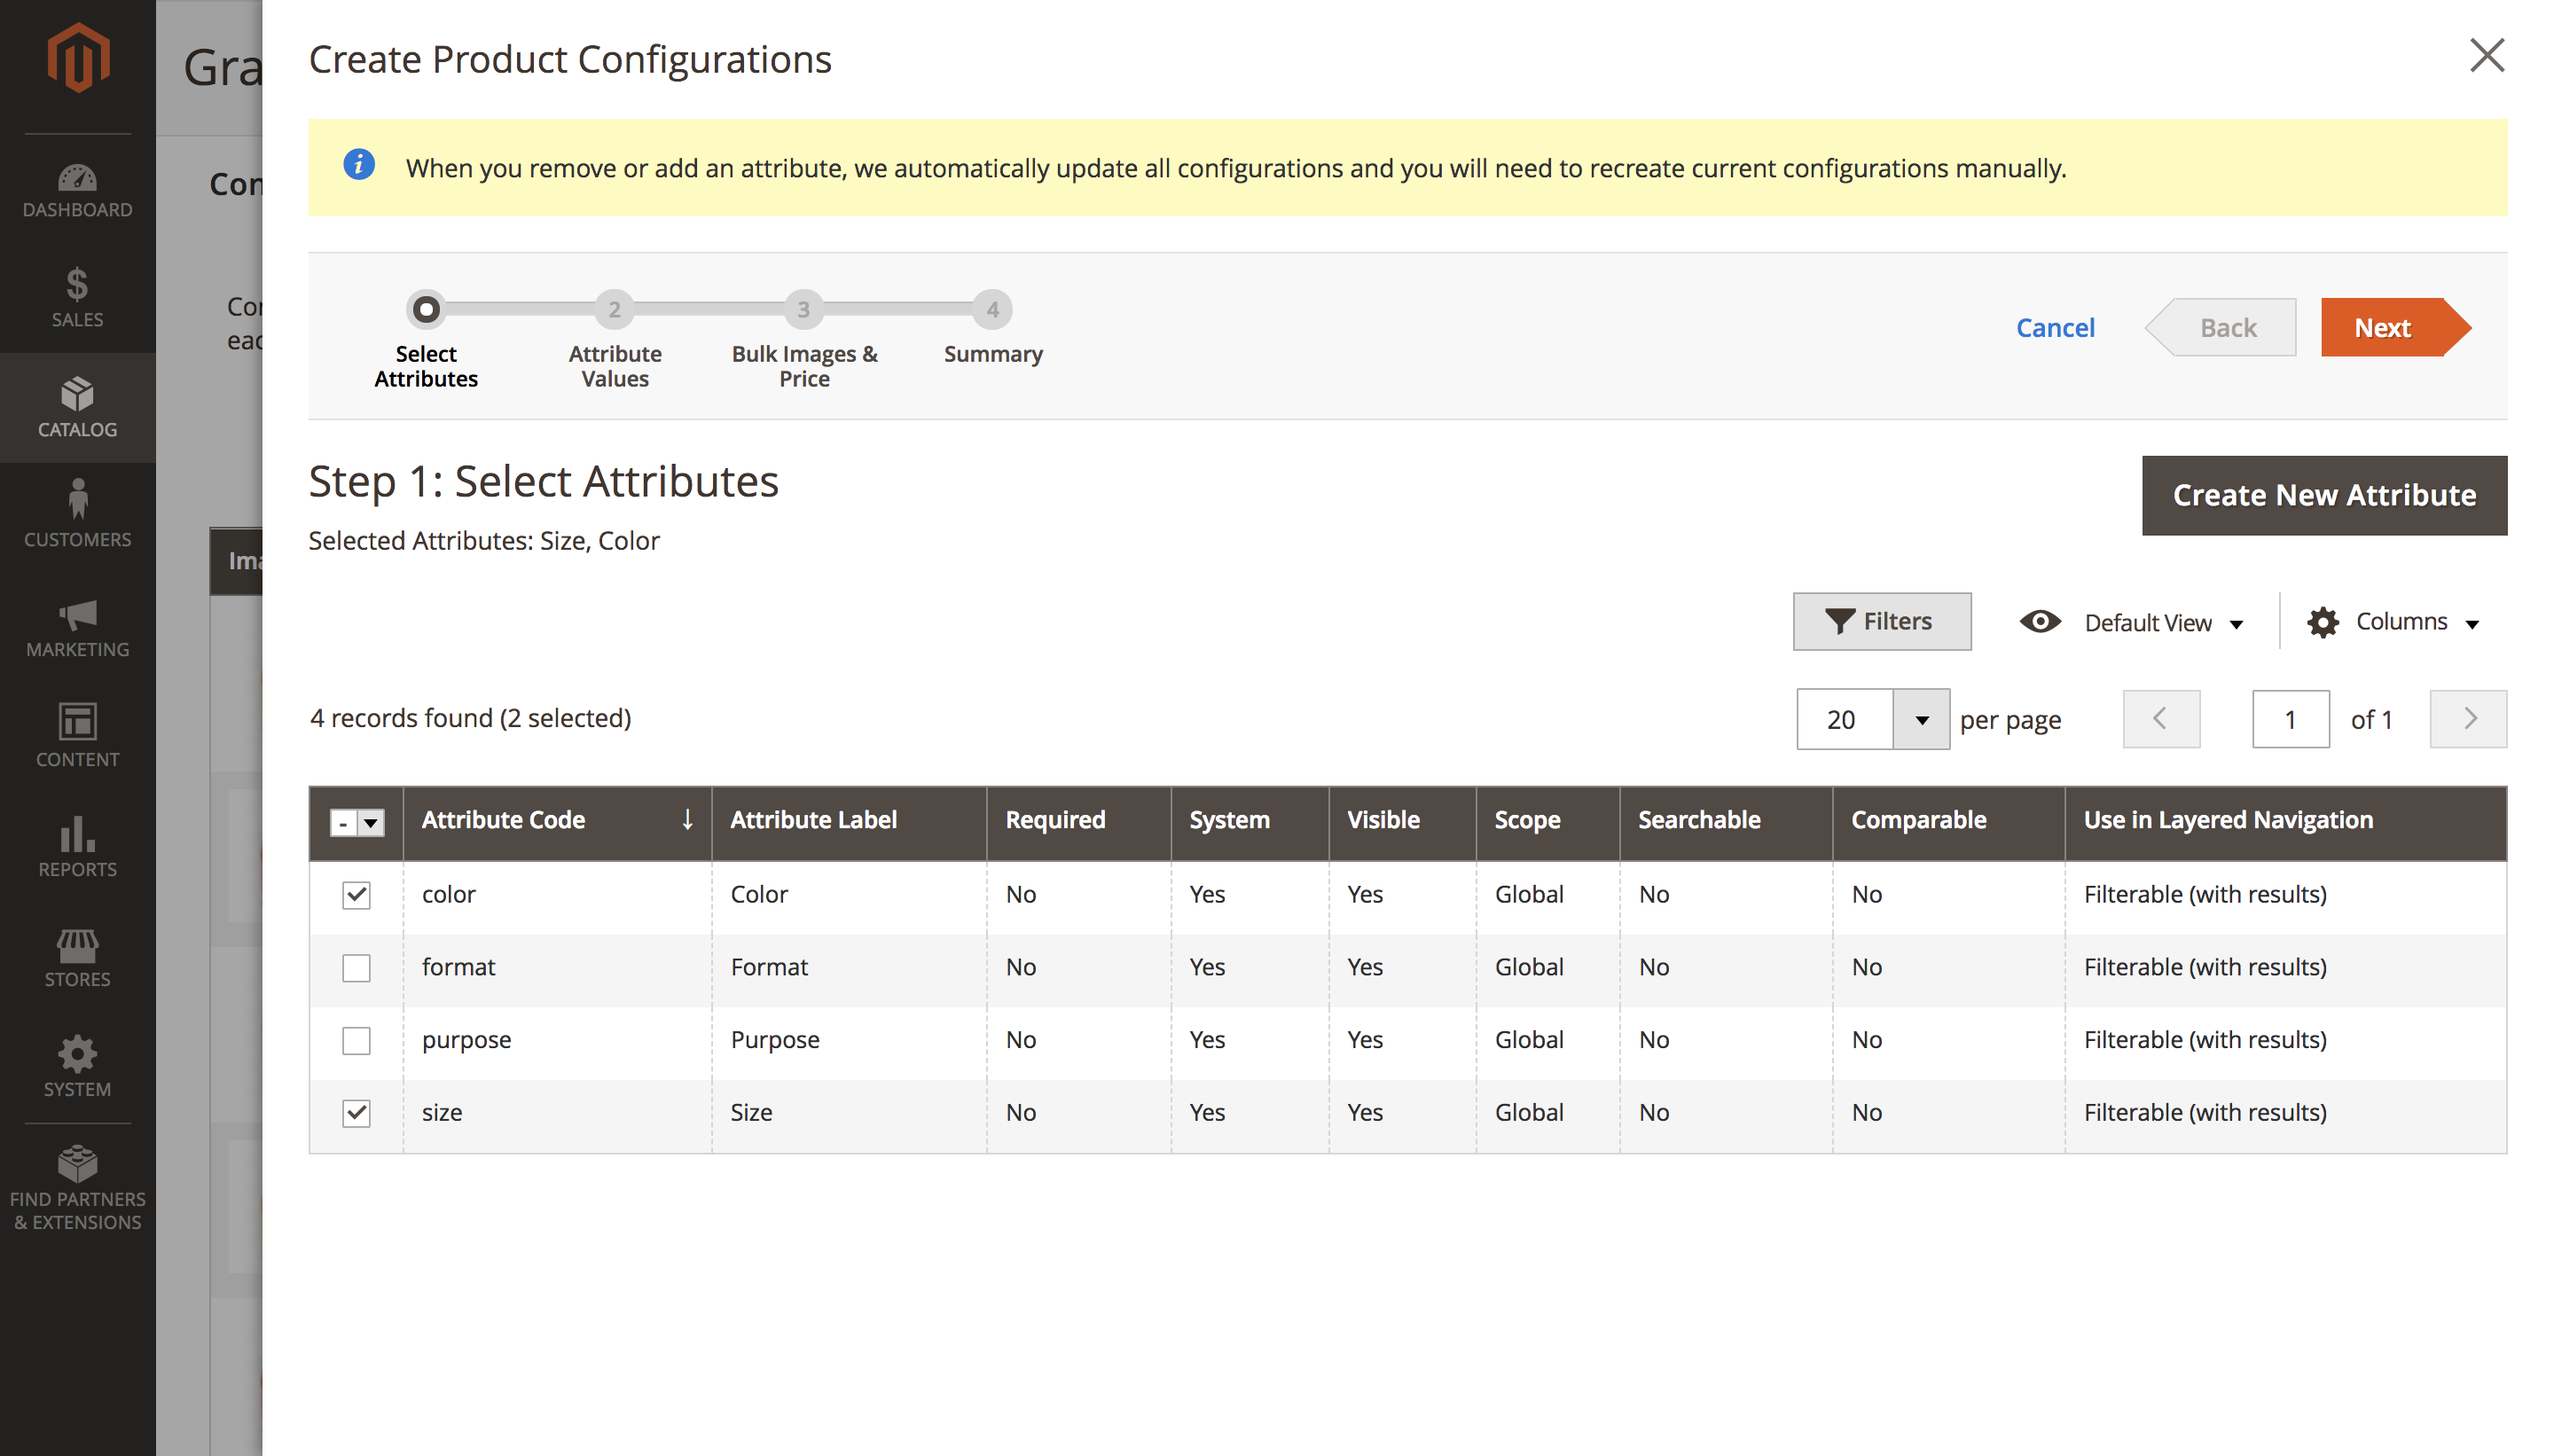 To create a new attribute: Select the “create a new attribute” button in the upper right corner of the window.
Configuration Section Setup – Step 2
Attribute Values: Select values from each attribute to include in this product. Each unique combination of values creates a unique product SKU.
Configuration Section Setup – Step 3
Bulk Images, Price, and Quantity: Based on your selection of attributes, new products will be created. In this section, you are able to specify specific images, prices and quantities associated with each attribute OR skip these sections and input this information later. If you choose to upload associated images, make sure they are of the custom image size selected for product pages.
- The quantity must be specified in the attribute section for the item to appear on the product page.
- You must specify “in stock” within the attribute section for the item to appear on the product page.
Configuration Section Setup – Step 4
Summary: Review the attributes and select “generate products.” Product Review Section: In this section, you can delete, “approve,” or “not approve” a review submitted by a user on the product page.
- To approve or not approve: Select the drop-down arrow in the “status” field and make the desired selection.
- To delete: Select “delete” from the top right corner between “back” and “reset.”
- Please note that editing of a review moves you from the catalog section of the admin to the marketing section.
Images and Videos Section Setup: Upload the accompanying image(s)/video to the product. Note that this is the image of the product, not the associated attributes.
Search Engine Optimization Section Setup:
URL Key: The unique URL key of a product is the end of the product page URL. The URL key should be 3-4 words that identifies concisely the product. This field will auto fill from the product name but can be changed in the SEO section if necessary.
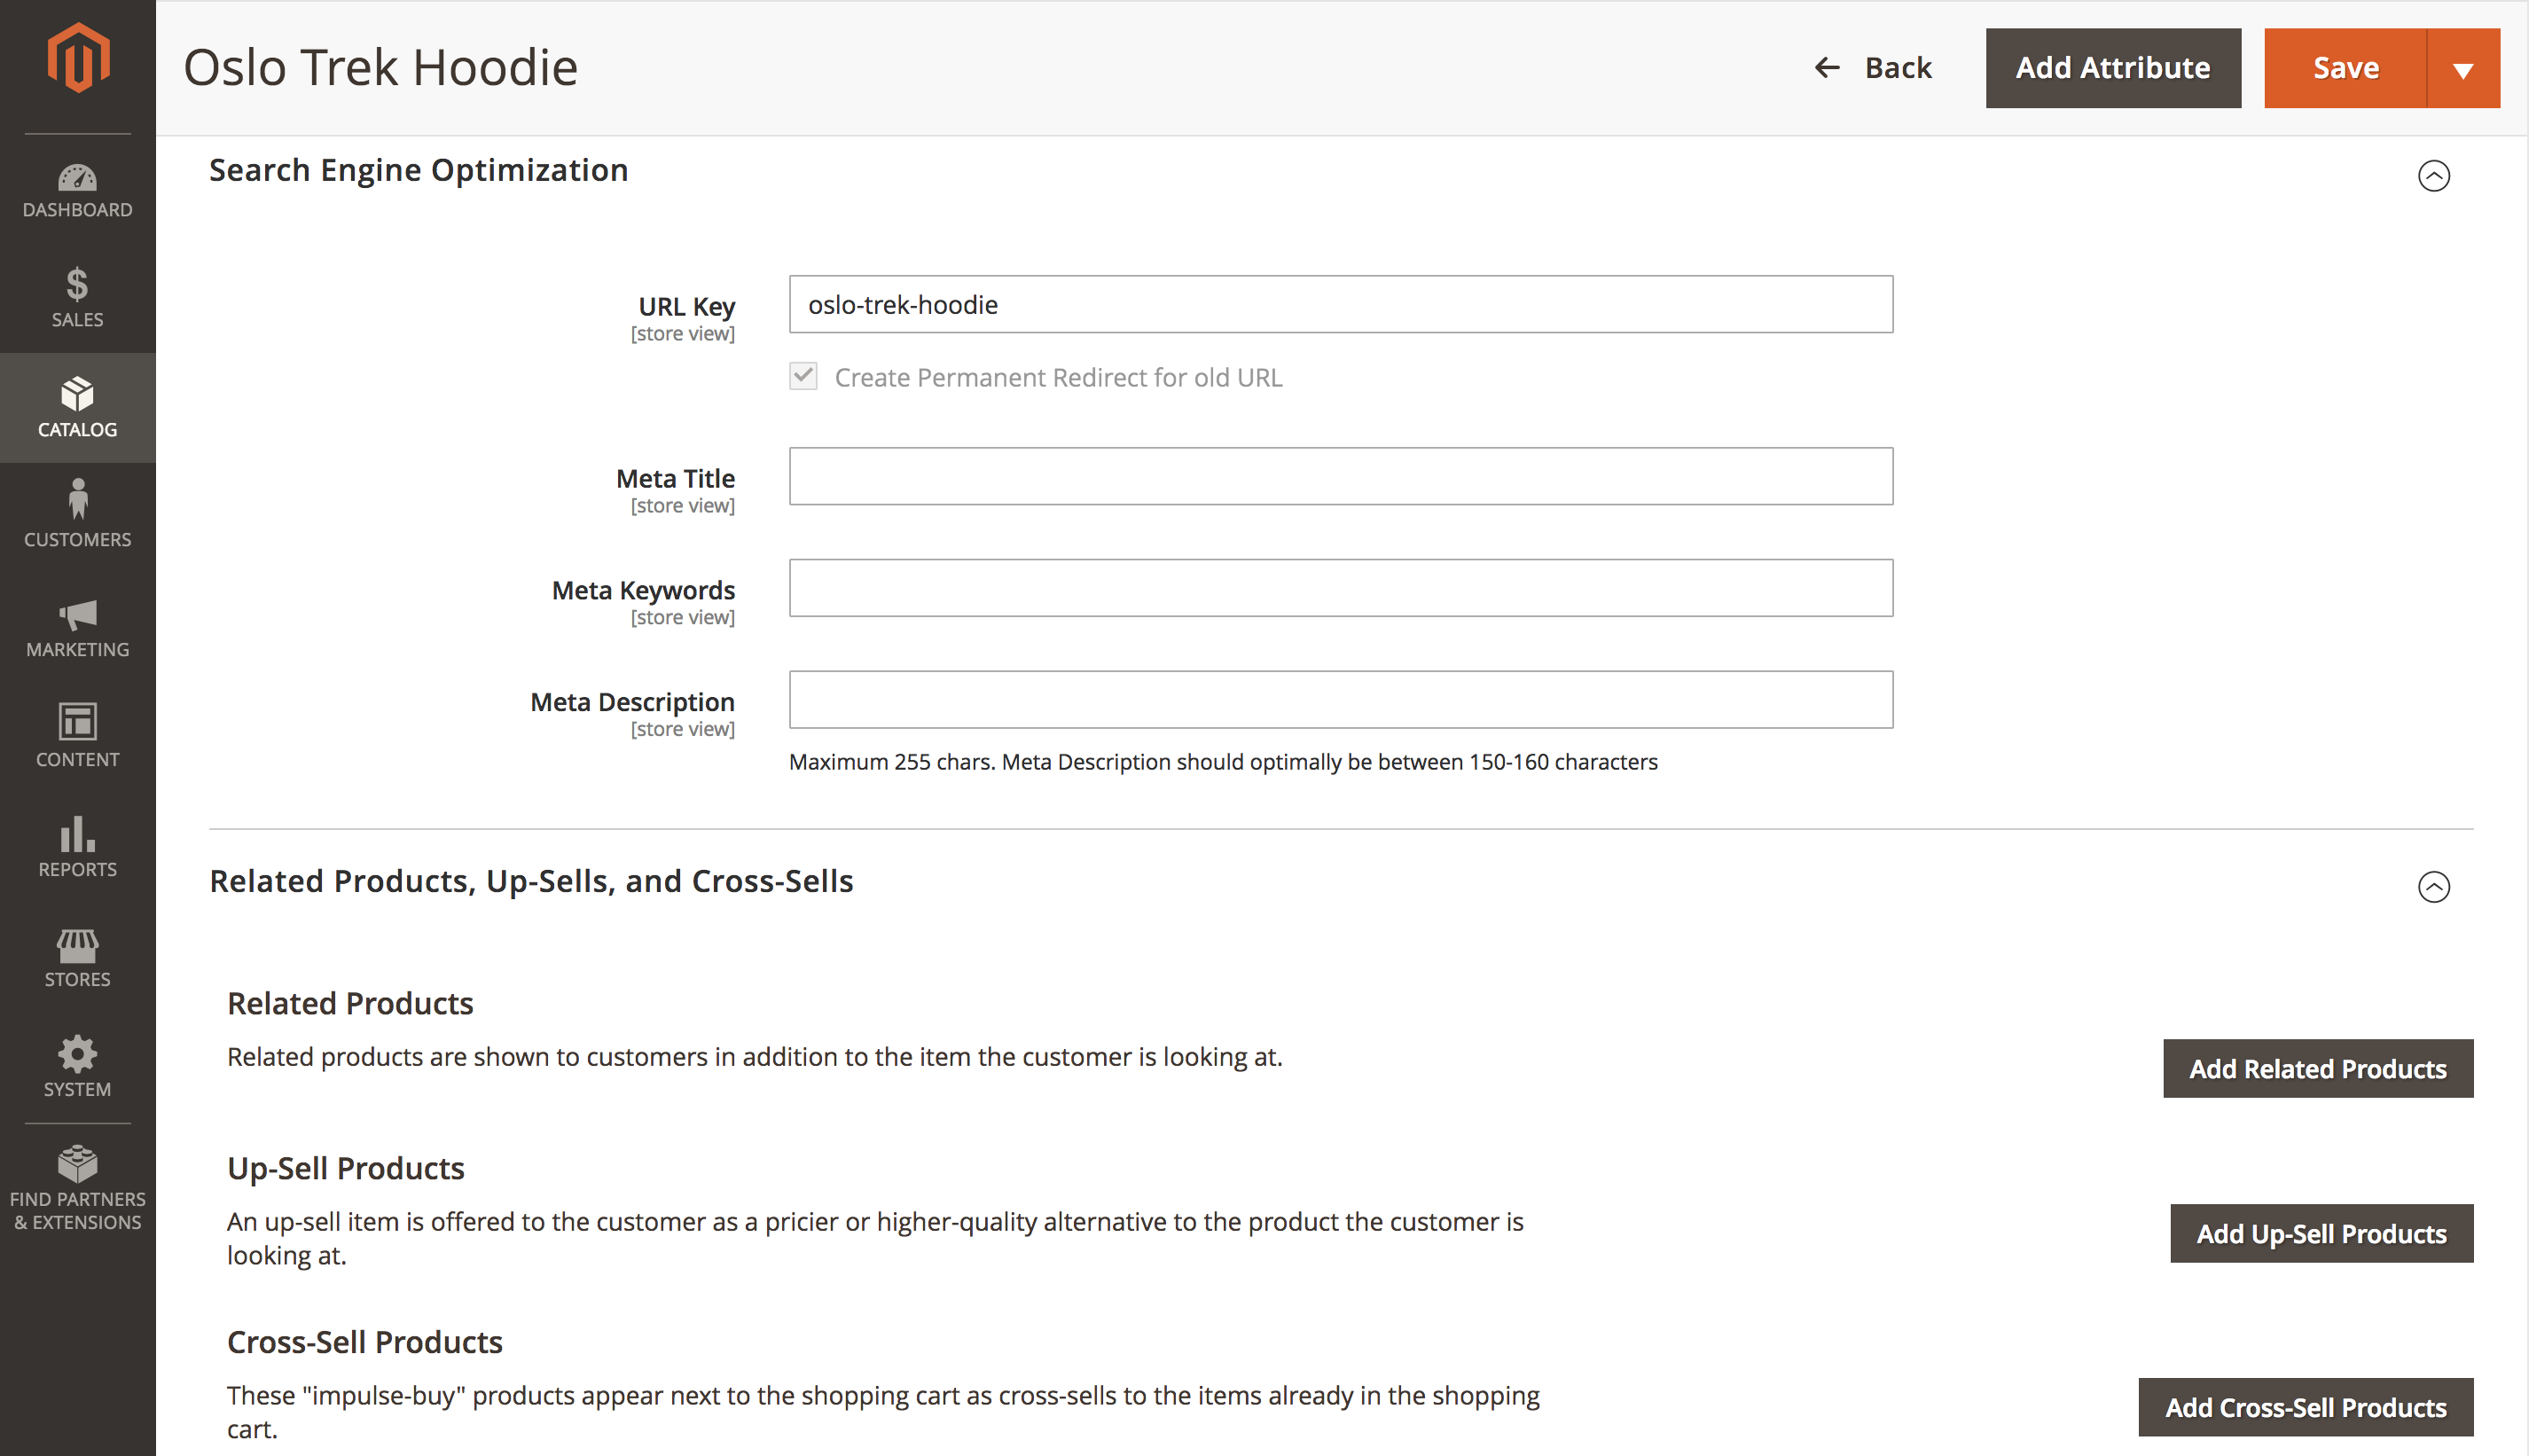 Meta Title: The meta title of a product is the title that appears when the product page is found on a SERP. This content should clearly and concisely define the product. Ex.: “Human Element Natural Duck Food | 40 lb Bag”
Meta Keywords: The meta keywords of a product page are the targeted keywords associated with the page. These are not required and may be added as a best practice, but search engines no longer consider these as a ranking factor.
Meta Description: The meta description of a product page is the text that appears beneath the Meta Title in a SERP. The meta title should be unique content (not a duplicate of on page content) and should include a brief description of the product and a maximum of 320 characters.
Related Products, Up-Sells, and Cross-Sells
In this section you can specify products that have already been created to associate with the product you are creating.
Related Products: Related products are shown to customers in addition to the item the customer is looking at. To add related products, select “Add Related Products” and select via checkbox on the left side of the window.
Up-Sell Products: An up-sell item is offered to the customer as a pricier or higher-quality alternative to the product the customer is looking at. To add up-sell products, select “Add Up-Sell products” and select via checkbox on the left side of the window.
Cross-Sell Products: These “impulse-buy” products appear next to the shopping cart as cross-sells to the items already in the shopping cart. To add cross-sell products, select “Add Cross-Sell products” and select via checkbox on the left side of the window.


